Cortana on your Windows Phone for Other Than US region

Tuesday, July 22, 2014
Get Cortana on your Windows Phone in India 

Now that we have successfully migrated from WP 8 to WP 8.1 one will be looking for Cortana…Those already having WP 8.1 and residing other than in US are not able to experience Cortana as it is only available for US. Don’t be sad, we have a work around for you. Few step and you will be spending time with your best companion Cortana.


Cortana


Before we get Cortana for your phone lets understand what Cortana could do or help you to do with your WP 8.1 device.
Cortana can help you do all sort of things on your Windows Phone, from making calls to checking your calendar, reminding you to pick up your dry cleaning, Birthday, Meeting or getting answers about sport results, stock prices, random trivia – you name it. She'll even chat with you.
You can start by talking naturally to Cortana about what you have in mind. She'll often understand you if you ask for things in the same way you'd say them to any person. If Cortana isn't sure what you mean, she can usually help you to work out how to say things in a way she'll understand.
She will even know who your relations are, Mom, Wife or your Office Boss.


Steps to enable Cortana

Step 1 - Change language setting to English US.

If you are residing in Non-US region and had selected language as English UK or India you have to change it to US. If you don’t find US English then you have to add the same.
Go to Settings > Language and add the language as a new entry on the list by hitting the add button. The phone may require a reboot.


Many will be stuck after installing English – United States. One need to make it as priority one. Just press and Hold the language bar… will get the above option of Move up. Select that and you will find that English United States had moved up and is your main Language. It will ask for Reboot.

Step 2 - Change Country Region and Regional Format

Now you have to change the Regional setting as Cortana is only available for US region we have to change it matching to that region. Go to Settings > Region and change "country/region" to the United States and "regional format" match phone language so that it is easier when switching back to your preferred region. The phone may require a reboot.


Step 3 – Change the Speech to US

Most of us forget to change the Speech to US English, one may have to install the language if already not installed. Go to Settings > Speech and change the Speech language from current to US English. You may be prompted to install the language if you had not done it before. 


If you had done exactly that I have explained then you have successfully enabled Cortana. If you cannot see Cortana listed as an app on the app list, give the phone a final reboot. You should then be able to load up the Cortana app, which will run you through the initial setup wizard. However, if you alter the region and/or language settings from here on out, you will remove Cortana but don’t worry if you revert to the setup you had set it will again be back in your handset.


Note: Few of the users had found that after updating and changing language and region it disable the Store from loading on some devices. So consider this a preview of Cortana, or just be aware there could be some negative consequences!
There you have it, folks. Don't attempt the above steps if you don't wish to have your region and language settings altered. 


After the reboot, hit the capacities Search key that seats besides Windows button. This should trigger setup wizard for Cortana.


Microsoft's Cortana is a better part of Siri and Google Now.
We've noticed that Cortana catches Indian accent very well. You can ask Cortana to place a call, send an SMS, or open an app.  
        
Please share your views and your experience with Cortana - Your new Companion


Read more ...

How to Install Windows 8.1 Update in Windows Phone

Friday, July 18, 2014

Windows 8.1 Update in Windows Phone


Next Generation with Techspecs

Windows Phone 8.1 which has been launched successfully with Nokia Lumia 630 (inbuilt) and very soon will be available for other W8 devices. It is yet to be available for other handsets as an upgrade. It really offers lots of new features which includes Cortana – already hit in the market.
Many of the enthusiast are looking for Cortana in their handset which has W8.1 as it is currently only available for US. Few had worked it out but many are looking for a solution.
Here I have tried to cover both the option… those who have W8 and want to upgrade to W8.1 and those who already have W8.1 and want to activate Cortana; other than US region.
Cortana – A virtual digital Assistance for WP.

Microsoft developed its virtual assistant for the Windows Phone operating system under the codename Cortana, but retained the name for the final product following a strong response in the developer community. The voice actor of Cortana in the games, Jen Taylor, provides the voice for the virtual assistant. Very soon we will have the Cortana virtual assistant on the Xbox One and in Windows 8.1.


Well now, Installing Windows Phone 8.1 as an ‘unofficial’ build like this will void your warranty.

 How to Download and Install Windows 8.1 Update in WP


Step 1: Just go to the Windows Phone app studio website

http://appstudio.windows.com/

Step 2:  click on ‘Start a New Project

This is a tool for developers to create simple web apps. There’s no cost involved – you just need to enter your Microsoft Live account login – probably Outlook/Live or an old Hotmail account.  

Step 3:  Go to the Windows Phone Store on your mobile phone.

Step 4:  Download ‘Preview for Developers’, the app that lets developers get an early look at new versions of the Windows Phone system. Again, this is totally free to download

WP 8.1 with Techspecs


Step 5: Once installed, load up the app and enter your live login details once more. This gives your phone the go-head that you’re ‘allowed’ to download Windows Phone 8.1 early.

Step 6: Now leave the app and go to the phone’s Settings menu and select Phone Update. Your mobile is ready to upgrade to WP8.1 and will start downloading the new Windows Phone 8.1 software. It will first upgrade to nearest OS and then finally to 8.1. Again, we strongly recommend backing up any essential data before updating, and think twice before doing this at all as it may leave your handset dead.

Be patient until the upgrade takes place as stopping or trying to stop the process may leave your handset dead which will not be covered under warranty.

That's it enjoy with Windows 8.1 in your Phones, however you will not be able to experience Cortana until you make certain changes in case you reside outside US.

Will cover it in the next post that follows...


Read more ...

Mobile Number Portability

Thursday, July 10, 2014

Mobile Number Portability


I remember a lot of my friends who were unable to move to other operator as they might lose out the contacts. Friends, relatives and important clients may not be able to contact you until you inform them about your new number.
Many of them kept the number and added one more connection of another operator but again one had to maintain and pay for both the numbers.

Then came MNP – a relief for many disgruntled customer who were longing to move to other operator but were bound not to. With this the user can move between operators keeping their number as it is. That means keeping my Number I can PORT-OUT (Leaving the operator) from Airtel and simultaneously PORT-IN (Selecting the new Operator) to Vodafone. One can choose across a various service telecom providers in India like Reliance, TATA, Airtel, Aircel, Vodafone, BSNL and Idea (GSM to GSM & CDMA to CDMA).

I have tried to share the process of port-out from Operator A and port-in to Operator B with the best possible and simplest way. The process remains same both for prepaid and postpaid but that prepaid process seems to be easier.

One must make up his mind if at all he want to Port-Out as once port-out successful and you had joined another network you will not be able to port-out until you complete 3 months cooling period. Also it can be done across all network but within the same circle. Kolkata to Kolkata and not Kolkata to Bihar or Odisha.


Please find below the Steps involved

1.    Clear all the Dues (Billed and Unbilled for Postpaid, positive balance for prepaid).
2.    Send a message as PORT<space>MSISDN to 1900
    1. E.g.: PORT 1234567890 and send this message to 1900.
3.    You will receive a UPC Code in message.
    1. Note down the UPC Code.
    2. The UPC is valid for 15 days
    3. 30 days in case of J&K, NE & Assam Service Areas.
4.    Visit the nearest Desired Operators Customer service center or the retailer
    1. Fill in the Form 
    2. Pay Rs. 19 as the charges
5.    In the form you have to mention UPC Code (From Step 1).
    1. Submit your Identity
    2. Address Proof
    3. Photograph.
6.    For Corporate/Company connections.
    1. NOC is required for MNP, duly signed and stamped on the company letter head by the authorized signatory of the company along with Documents in Step 5.
    2. PAN Card.
    3. ID proof
7.    The customer center will give an empty sim, after your payment and document submission. Within 1 day you will receive an acceptance message to confirm the porting.
8.    Change over takes place on the 7th working day (15th working day in case of Jammu & Kashmir, Assam and North East service areas). You will get an SMS from the operator with the date and time for porting. The service disruption time shall not be more than 2 hrs during night time of the date/time of porting.
9.    Insert the new sim in your phone, now you are in the new network with old number.
Once you ported to new operator, the minimum time to stay with the new operator is 3 months. So in this 3 months’ time you cannot port your number once again. Also MNP currently is possible only within your telecom circle.

MNP process for both prepaid as well as postpaid connections is same but porting a prepaid sim card is the fastest and easier than postpaid however with the right set of verified documents the process smooth-ens.


Operators always try to retain their valued customer by offering them some discounts or concession. MNP may not be the best solution but certainly gives the customer an opportunity to get the best for themselves.


Please share your valuable inputs to continuously improve and update.

Read more ...

How to RESET the iPhone

Wednesday, July 02, 2014

How to RESET iPhone


Many a Times you may need to reset your iPhone for several reasons like to fix minor or major problems and bugs, to erase data before selling, problems with touchscreen, buttons or switches.
Depending upon our need we can choose between  2 (TWO) different types of RESET Options in an iPhone or any other Brand of Smartphone.
The reset process mentioned below are applicable to all models / generations of iPhone including – Original iPhone, iPhone 5S, iPhone 5C, iPhone 5, iPhone 4S, iPhone 4, iPhone 3GS, iPhone 3G.


SOFT RESET:


We usually do Soft Reset when our phone give minor problem. These type of issue arise due to buggy or crashed apps.
It doesn't delete any data from the handset but only clears the Memory log or bad files.
Soft reset of the iPhone will clear the memory and fix the problems. Soft reset does not delete or removes ant data or information, apps, songs, contacts etc from the iPhone.

HARD RESET:


We usually do hard reset to reset the phone to factory setting. It generally deletes all Data from the phone making it to Factory Default.
However it is recommended to back up the necessary documents/Data of your phone before carrying out the process.


iPhone Soft Reset Process

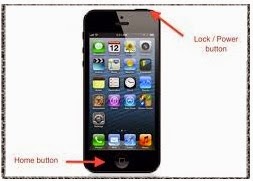
  • Simultaneously press and hold the Home button located at the center bottom of the iPhone and the Sleep/Wake button located at the top of the iPhone.
  • Continue holding both buttons until the iPhone shuts down and again restarts. The process could take about 10 to 20 seconds. Once the iPhone shuts down, you can leave the buttons.
  • After 10 to 20 seconds you will see the Apple logo on the screen.
  • Now the iPhone will take some time to reset everything
  • Sit down and allow the phone to reset itself. 
Now the soft reset of your iPhone is done.


iPhone Hard Reset Process 

  • Go to “Settings“
  • Select “General“
  • Scroll down and select “Reset“.
  • Here you will find few options like – Reset All Settings, Erase All content and Settings, Reset Network Settings.
  • For Hard Factory Reset, select “Erase All Content and Settings“
  • The iPhone will ask for pass code / password.
  • Enter the password and confirm.
  • Now the phone will start the reset process which could take few minutes.
  • Sit down and allow the phone to reset itself.


Once hard reset is done, your iPhone will be same as it was shipped from the factory.
Please visit nearest service center if the issue doesn't resolve even after soft or hard reset.


Read more ...

How to Reset Nokia Lumia

Wednesday, July 02, 2014

How to Reset Nokia Lumia


Touch Screen not working and stuck with your Lumia handset, unable to Switch On or Off the device. Want to RESET the phone, here you go.
Please follow the below process to RESET your phone, if it doesn’t work thereafter then please visit nearest service center.


SOFT RESET
:

We usually do Soft Reset when our phone give minor problem. These type of issue arise due to buggy apps or crashed apps.
It doesn’t delete any data from the handset but only clears the Memory log.

Press and hold the POWER & VOLUME DOWN  buttons simultaneously for ten seconds.
The phone should then vibrate and reboot on its own.

HARD RESET
:

We usually do hard reset to reset the phone to factory setting. It generally deletes all Data from the phone making it to Factory Default.
Many users who have done this method claims that hard reset using the hardware buttons did not delete the user data.

However it is recommended to back up the necessary documents/Data of your phone before carrying out the process.


Press and hold the POWER & VOLUME DOWN  & CAMERA buttons until the phone vibrates.
Then release the power-button and keep the other two buttons pressed for another five seconds.

Please wait patiently until the process complete.
Read more ...